Condensing My Bees Down For Winter
- Laurence Edwards

- Dec 6, 2024
- 6 min read
Should I Condense My Bees Down For Winter?
As a passionate beekeeper, I'm always eager to share my knowledge and experience with fellow enthusiasts. In this in-depth blog post, I'll explain why I condense my bee colonies down for the winter months - a practice that can be incredibly beneficial for the health and survival of your hives.

The Importance of Proper Winter Preparation
Preparing your bee colonies for the winter is a critical aspect of successful beekeeping. As the weather turns colder and the days grow shorter, your bees will need to make some significant adjustments to ensure they can make it through the harsh winter conditions. One of the most important steps in this process is condensing your colonies down to the appropriate size. Here are a few key reasons why this is so important:
1. Reduced Energy Expenditure
Bees expend a significant amount of energy keeping their hive at the optimal temperature throughout the winter. A smaller, more compact colony requires less energy to maintain this temperature, as there is less empty space that needs to be heated. By condensing the colony down, you're essentially making it easier for the bees to regulate the hive's temperature, reducing the risk of starvation over the winter months.
2. Improved Pest Management
Another benefit of condensing your colonies is that it can greatly enhance the effectiveness of your Integrated Pest Management (IPM) program, particularly when it comes to controlling varroa mites.
When your colonies are spread out across multiple boxes or frames, it can be challenging for the mite-control treatments (such as Apivar strips or Oxalic Acid) to effectively reach all areas of the hive. By condensing the colony into a smaller, more compact space, the mite-control treatments have a better chance of distributing evenly throughout the entire hive, leading to higher mite drop rates and healthier bees going into winter.

3. Enhanced Colony Defence
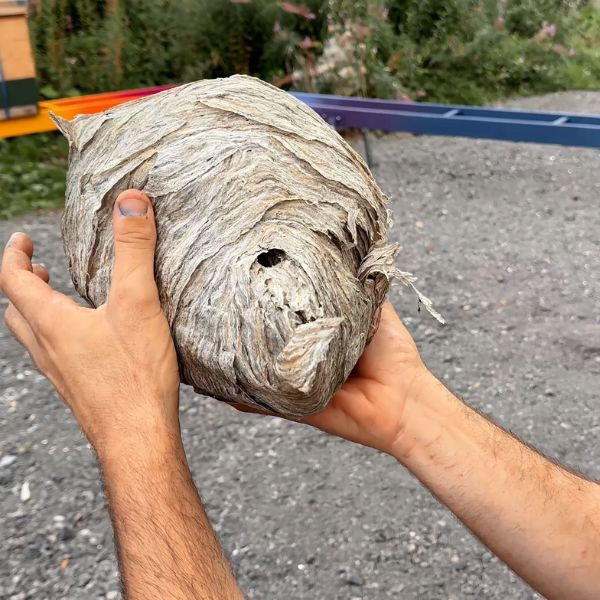
Lastly, a condensed colony is simply better equipped to defend itself against potential robbers and pests, such as wasps, that may try to infiltrate the hive during the late summer or early winter months. With a larger, more concentrated population of worker bees guarding the entrance, your colonies will be better able to fend off any unwanted intruders, protecting their precious resources and ensuring their survival.

Implementing the Condensing Process
Now that we've explored the key benefits of condensing your bee colonies for winter, let's dive into the practical steps involved in the process.
Timing is Everything
The optimal time to condense your colonies will vary depending on your local climate and the specific needs of your bees. In my experience, the end of August to the middle of September is generally the sweet spot, as it allows the bees to have a few weeks to adjust to their new, more compact living situation before the truly cold weather sets in.
It's important to note that you don't want to condense your colonies too early in the season, as you'll want to give them ample time to build up their winter stores and population. Conversely, waiting too late in the year can make the process more challenging and increase the risk of issues like robbing or starvation. I condense my bees at the same time I take off my honey crop. If there isn't enough space and the bees are bearding outside the front of the hive, you can add another permanent or temporary brood box. Most colonies are able to be suitably condensed down to a single brood box for winter.

The Condensing Technique
The actual process of condensing your colonies is relatively straightforward. Here's how I typically approach it:
Assess Colony Strength: Begin by evaluating the strength and size of each of your colonies. Identify the ones that are thriving and those that may need a bit more attention.
Reduce Hive Space: For the stronger colonies, I'll remove any additional boxes or supers during the honey harvest, leaving them with just a single brood box. This ensures that the bees are concentrated in a smaller, more manageable space. If they beard outside the front you can add an empty super as an interim to give them somewhere to cluster and remove it after a few days, before they start to build wild combs inside.
Monitor and Adjust: Throughout the process, I'll keep a close eye on the colonies, making any necessary adjustments to ensure the bees are comfortable and thriving in their new, more compact living situation. The most obvious adjustment required is to give them additional boxes if the bearding is severe. As long as the weather is set fair, I like to see a small amount of bearding as it shows the colony is filling the box!
Maintaining Proper Ventilation/Insulation
It's important to note that while condensing the colony is crucial, you also need to ensure that the hive maintains proper ventilation/insulation. Bees produce a significant amount of moisture as they cluster and generate heat, and if this moisture is not allowed to escape, it can lead to issues like mould, mildew, and even the dreaded "damp" that can devastate a colony.

To address this, I'll leave my bees on their open mesh floors to allow excess moisture to vent out while still maintaining the overall compact nature of the colony. This helps to create a healthy, well-ventilated environment for the bees to thrive in throughout the winter. I always ensure the top of the hive is the most insulated to avoid any condensation dripping on the winter cluster. This ensures the condensation forms on the side walls and tracks out of the hive without causing any moisture related issues.

Addressing Potential Challenges
As with any beekeeping practice, there can be some challenges and potential pitfalls to be aware of when it comes to condensing your colonies for winter. Let's take a look at a few of the most common issues and how to address them:
Robbing Behaviour
One of the biggest concerns with condensing colonies is the increased risk of robbing behaviour. When bees are confined to a smaller space, they can become more aggressive in defending their resources, which can lead to intense robbing battles between colonies.
To mitigate this risk, I'm very careful to ensure that any empty or unused equipment is removed from the apiary, as these can serve as tempting targets for robber bees. I also make sure to closely monitor the hive entrances, ready to take action if I notice any signs of robbing activity. Feeding a light 1:1 syrup at this time helps to ensure the bees don't need to rob their neighbouring hives.
Starvation Concerns
Another potential issue with condensing colonies is the risk of starvation. By reducing the available space (and removing their honey crop), you're essentially concentrating the bees' food stores into a smaller area. If the colony doesn't have adequate stores to begin with, this can lead to starvation over the winter.
To address this, I always make sure to assess the colony's food stores before condensing them down. If a colony is looking a bit light on stores, I'll provide them with supplemental feeding, in the form of 1:1 sugar syrup to ensure they have enough to sustain them through the winter. Check out my latest BLOG to see how I transition through syrup feeding to get the bees ready for winter - https://www.blackmountainhoney.co.uk/post/when-is-it-too-late-to-feed-your-bees-for-winter

Swarming
By condensing your colonies late in the season, there is a risk that this may trigger late season swarming due to over congestion. I find condensing colonies triggers around 5% of colonies to swarm. To mitigate this, if excessive bearding is taking place, you can add another brood box and overwinter those colonies on double brood. A small amount of bearding is fine but if it looks like 50% of the bees are on the outside of the hive, double the boxes up to reduce this risk.
The Benefits of a Smaller Footprint
By condensing my bee colonies down for the winter, I've been able to enjoy a range of benefits that have helped to improve the overall health and survival of my hives. Here are just a few of the key advantages I've experienced:
Reduced Energy Expenditure: With the bees concentrated in a smaller space, they expend less energy maintaining the optimal hive temperature, conserving their precious winter stores.
Enhanced Pest Management: The more compact colony layout allows for more effective distribution of mite-control treatments, leading to higher mite drop rates and healthier bees.
Improved Colony Defence: The concentrated population of worker bees at the hive entrance makes it much easier for the colony to fend off any potential robbers or pests and protects the frames from unwanted visitors such as mice, wax moths or small hive beetles.
Simplified Hive Inspections: With the colony condensed into a single brood box, it's much easier for me to quickly assess the overall health and status of the hive during my regular inspections.
Streamlined Hive Management: By reducing the number of boxes I need to manage late in the season, I can save time and effort, allowing me to focus on other important beekeeping tasks.

Promoting Healthy, Thriving Colonies
Ultimately, the decision to condense your bee colonies for the winter months is a crucial one that can have a significant impact on the long-term health and survival of your hives. By taking the time to properly prepare your colonies for the colder weather, you're setting them up for success and ensuring they have the best possible chance of making it through the winter.


The writing is so engaging and flows perfectly. It’s clear that a lot of effort went into making this article both informative and enjoyable to read. Link Cnnslot
This article hits the point perfectly! I relax at slot RTP tinggi RUBY8000 .
hassle.
mevius88 mantap168 kinitoto dvtoto gorila39 betogel inatogel wdbos viral4d apace138 apace138 inatogel gorila39 gorila39 betogel budaya4d budaya4d inatogel inatogel inatogel inatogel jiwaspin kedai69 kedai69 jiwaspin kinitoto kinitoto kokitoto kokitoto konco88 konco88 liga788 liga788 royaltoto mevius88 mevius88 maxwin89 maxwin89 maxwin89 maxwin89 pelangi189 pelangi189 tip4d tip4d theoutlook.asia wingede wingede mahkota555 mantap168 mio777 moli77 betogel betogel betogel betogel bintang4dp bintang4dp bintang4dp bintang4dp bintang4dp bintang4dp dprtoto idoslot pelangi189 asustogel bandungtoto betcash303 boyabet88 budaya4d bulan33 bulantogel buntogel davo88 dorahoki inatogel inatogel inatogel jayatogel jayatogel jayatogel jayatogel jayatogel jayatogel jayatogel jualtoto kartutoto kdslots777 kingdomtoto kingdomtoto kingdomtoto lapakhoki88 limatogel lobster4d ltdtoto mastertogel mawartoto mawartoto megaslot288 merdeka138 mono77 mpo88asia nadimtogel napi4d oppatoto pos4d pos4d qq88asia juragan69 rajatogel rajatogel rajatogel ratutogel ratutogel roda4d royaltogel royaltotopedia royaltoto royaltoto shiokambing sohotogel sultantoto sultantoto togelcc togelcc togelcc togelup togelup totobet totobet totojitu totojitu turbobet77 vava4d win4d winlive4d vegas969 tip4d dorahoki nanastoto ziatogel lunatogel ak4d ak4d ak4d ak4d inatogel toto88 dingdongtogel dolantogel dorahoki jeboltogel nadimtogel nanastoto protogel togelup toto12
aaaaaaaaaaaa