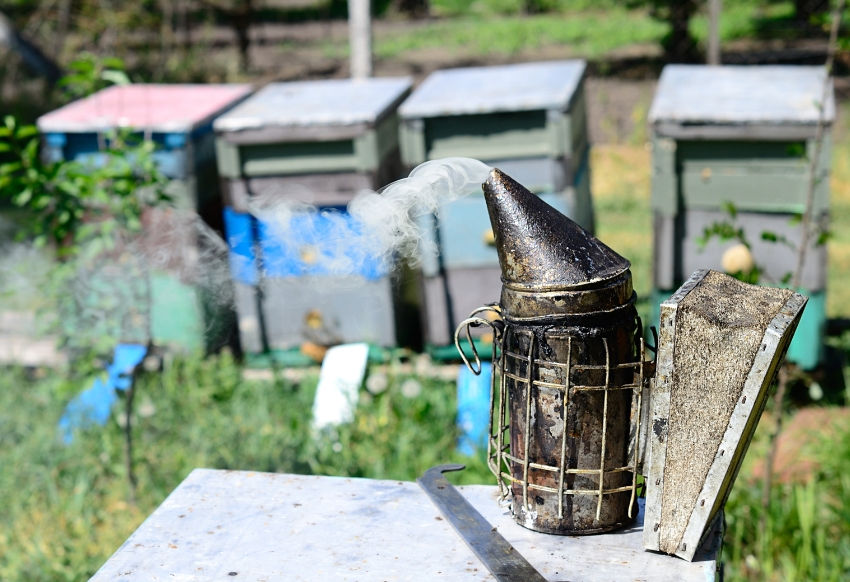
How To Light A Bee Smoker - Heat, Fuel and Cool
- Laurence Edwards

- Jan 18
- 6 min read

How to Light A Bee Smoker
When I first started beekeeping, lighting a smoker felt like the hardest job in the apiary. I could get it going for five minutes, then it would die the moment I opened a hive. Over the years I have refined a very simple, repeatable method for how to light a smoker so it stays lit through multiple inspections.
In this blog I will walk you through my exact step by step process. I will explain what to burn, how much to use and why your smoker keeps going out. I will also show you how the right smoker technique keeps your bees calmer and your inspections safer.

Why your smoker matters more than you think
A lot of new beekeepers see the smoker as an optional extra. In reality it is one of the most important tools you own. Cool, consistent smoke helps you:
Calm defensive colonies so you can work safely
Mask alarm pheromones when you roll bees or drop a frame
Move bees gently off frames without crushing them
Buy yourself time to find the queen or eggs without the bees boiling over
If your smoker is constantly going out, you will rush, you will make mistakes and your bees will become more defensive over time. Learning how to light a smoker properly is a simple skill that makes every other job in the apiary easier.
The simple formula I use every time
My approach is built around a very simple formula that you can repeat on every inspection.
Heat
Fuel
Cool
If you get those three stages right, your smoker will stay lit. If any one of them is wrong, you will struggle. Here is how I apply that formula in practice.

Step 1: Heat - Strong Flames With Dry Cardboard
I always start with dry, clean cardboard. Corrugated cardboard works especially well. I tear a strip, roll it loosely and place it in the bottom of the smoker. Then I light it properly. This is where most people go wrong. They wave a lighter at the smoker for a couple of seconds and expect it to work.
I hold the flame on the cardboard until it is fully burning. I want visible flames and a proper ember bed. At this stage I am not trying to produce cool smoke. I am creating a strong heat source that will ignite the main fuel later. I pump the bellows firmly to feed that fire with oxygen until the cardboard is glowing red.

Step 2: Fuel - Just Enough Wood Pellets
Once I have that solid base of heat, I add my main fuel. My preferred choice is wood pellets because they are consistent, clean and easy to store. This is where the second part of the formula comes in: fuel.
If you add too few pellets, your smoker will burn out quickly. If you add too many, you will smother the flames and the smoker will go out. I sprinkle in a moderate handful of pellets, never filling the firebox to the brim at this stage.
As I add them, I keep working the bellows so the pellets catch properly. Within a minute or two the pellets are burning steadily and I am getting thick, hot smoke out of the top. At this point the smoker is powerful but the smoke is still too hot to use directly on the bees.
I get the burner working in the top as well to start to burn the pellets. This means both the top and bottom of the smoker are smouldering at the same time, when you later close the lid.

Step 3: Cool - A Green Grassy Plug
The final step is the cooling phase. This is what protects your bees from hot smoke and also helps the smoker stay lit for a long time.I take a good handful of fresh, green grass and pack it tightly into the top of the smoker. This grassy plug acts like a filter.
The hot smoke passes through the damp material, cools down and exits as a gentle, cool smoke that is safe for your bees. It also slows the burn rate, giving you much longer run time from the same fuel load.
So the full formula looks like this:
Heat - cardboard and real flames
Fuel - wood pellets, just enough
Cool - a tight plug of green grass
If you follow that pattern, your smoker will be far more reliable.

My Start To Finish Smoker Lighting Routine
Here is exactly how I light a bee smoker before an inspection.
Open the smoker and make sure yesterday’s ash is tipped out.
Roll a strip of dry cardboard and place it in the bottom.
Light the cardboard with a lighter or blowtorch and keep the flame on it until it is burning strongly.
Pump the bellows firmly until the cardboard is glowing and producing its own heat.
Sprinkle in a good handful of wood pellets, then continue to pump the bellows so they all catch.
When you see steady smoke and hear a gentle crackle, pack in a tight plug of fresh green grass.
Close the lid and give a few test puffs. You should see thick, cool smoke that does not feel hot on the back of your hand.
If you can put your hand in the smoke stream for a few seconds without any discomfort, it is cool enough for the bees.
Why Your Smoker Keeps Going Out
Most of the messages I get from beekeepers saying my smoker keeps going out fall into one of these problems.
Not enough heat at the start
Trying to light damp or dirty fuel
Overfilling the smoker and smothering the fire
Not pumping the bellows enough in the first few minutes
Leaving the smoker open in strong wind
If you rush the lighting stage, the rest of the process will always be a fight. Spend an extra minute at the beginning building a proper ember bed and everything becomes easier.
Once the smoker is running, give it a few puffs every ten to fifteen minutes during your inspections to keep fresh air moving through the fuel.

Choosing The Best Fuel For A Bee Smoker
There are lots of fuels that will work. Some are better suited to beginners than others. Over the years I have tried pretty much everything.
Wood pellets - clean, consistent and easy to handle. They are my first choice for most inspections. I like the lavender ones - https://beekeeping.co.uk/products/lavender-smoker-pellets-1kg
Hessian sacking - burns well when untreated and can give a long, steady burn.
Pine cones and natural materials - can work brilliantly if fully dry but very variable.
Cardboard only - fine for a very quick job but tends to burn too fast on its own.
Whatever you choose, avoid anything treated, painted or contaminated. You want clean fuel that will not introduce chemicals into your hive. Start with one main fuel, learn its behaviour and only then experiment with others.
Keeping Things Safe, Tidy And Ready To Use
A well lit smoker is a powerful tool, but it is still a live fire. I always work with a metal smoker stand or spare upturned roof so there is no risk of starting a grass fire. At the end of an inspection, I either:
Let the smoker burn out naturally in a safe place, or, knock the contents into a metal bucket and douse with water.
Never tip hot ash onto dry grass or near wooden pallets. It only takes a single ember to create a problem you will regret.
I also take a minute at the end of the day to scrape off soot, check the bellows and make sure the lid closes properly. A clean, functioning smoker is much easier to light next time you head out to the apiary.

Smoker Technique And Calmer Inspections
When your smoker is reliable, you can focus on your bees. A couple of gentle puffs at the entrance, a little smoke under the crown board and a light waft over the top bars is often all that is needed.
The key is to keep the smoke cool, consistent and controlled. That is why I teach smoker technique as a core part of my wider system in 14 Day Beekeeper.
If you can light a smoker that stays lit, move confidently through a hive and understand what you are looking at, everything about beekeeping becomes less stressful.
Learn The Full System Inside 14 Day Beekeeper
If you would like me to walk you through every part of hive management in the same simple, step by step way I have used here, take a look at my 14 Day Beekeeper online training.
14 Day Beekeeper overview -
Inside the course I show you how to plan inspections, read brood patterns, prevent swarming, manage Varroa, feed correctly and a lot more. Lighting the smoker is just one part of a complete, repeatable system for keeping bees healthy and producing more honey.
Further Watching And Resources
If you would like to see more of my smoker setup and fuel choices in real time, you can watch these videos from my YouTube channel Black Mountain Honey:
Hessian Sack Smoker Fuel - a closer look at a simple, natural smoker fuel that works very well in UK conditions -
RAUCHBOY SMOKER - a review and demo of one of the smokers I use in my own apiaries -


Greetings from the UK! I recently saw a discussion of this platform on a forum where many people commented on its user-friendliness, so I decided to check it out myself. My first impression was very positive: a modern interface, fast page loading, clear navigation, and all the necessary information gathered in one place. I especially liked that the service is equally easy to use on both a computer and a phone. In my opinion, these are the types of platforms that inspire confidence from the very betblast casino first moment of use and make daily use truly convenient 😀
I stumbled here by accident while searching for 'rhino' local parks in the UK. Search results are unpredictable; I was first shown rhino-casino.uk by mistake! But then I found your guide to Cotswold festivals. It was a lucky find! We wanted something authentic far from the screens. This discovery is exactly what we needed for our family trip today! It's such a lucky strike!!!!!